Your command center
Admin Portal
From here you can configure every aspect of iPass for your school — passes, locations, users, and more.
Dashboard
The Dashboard is divided into two main tabs: Analytics and Locations.
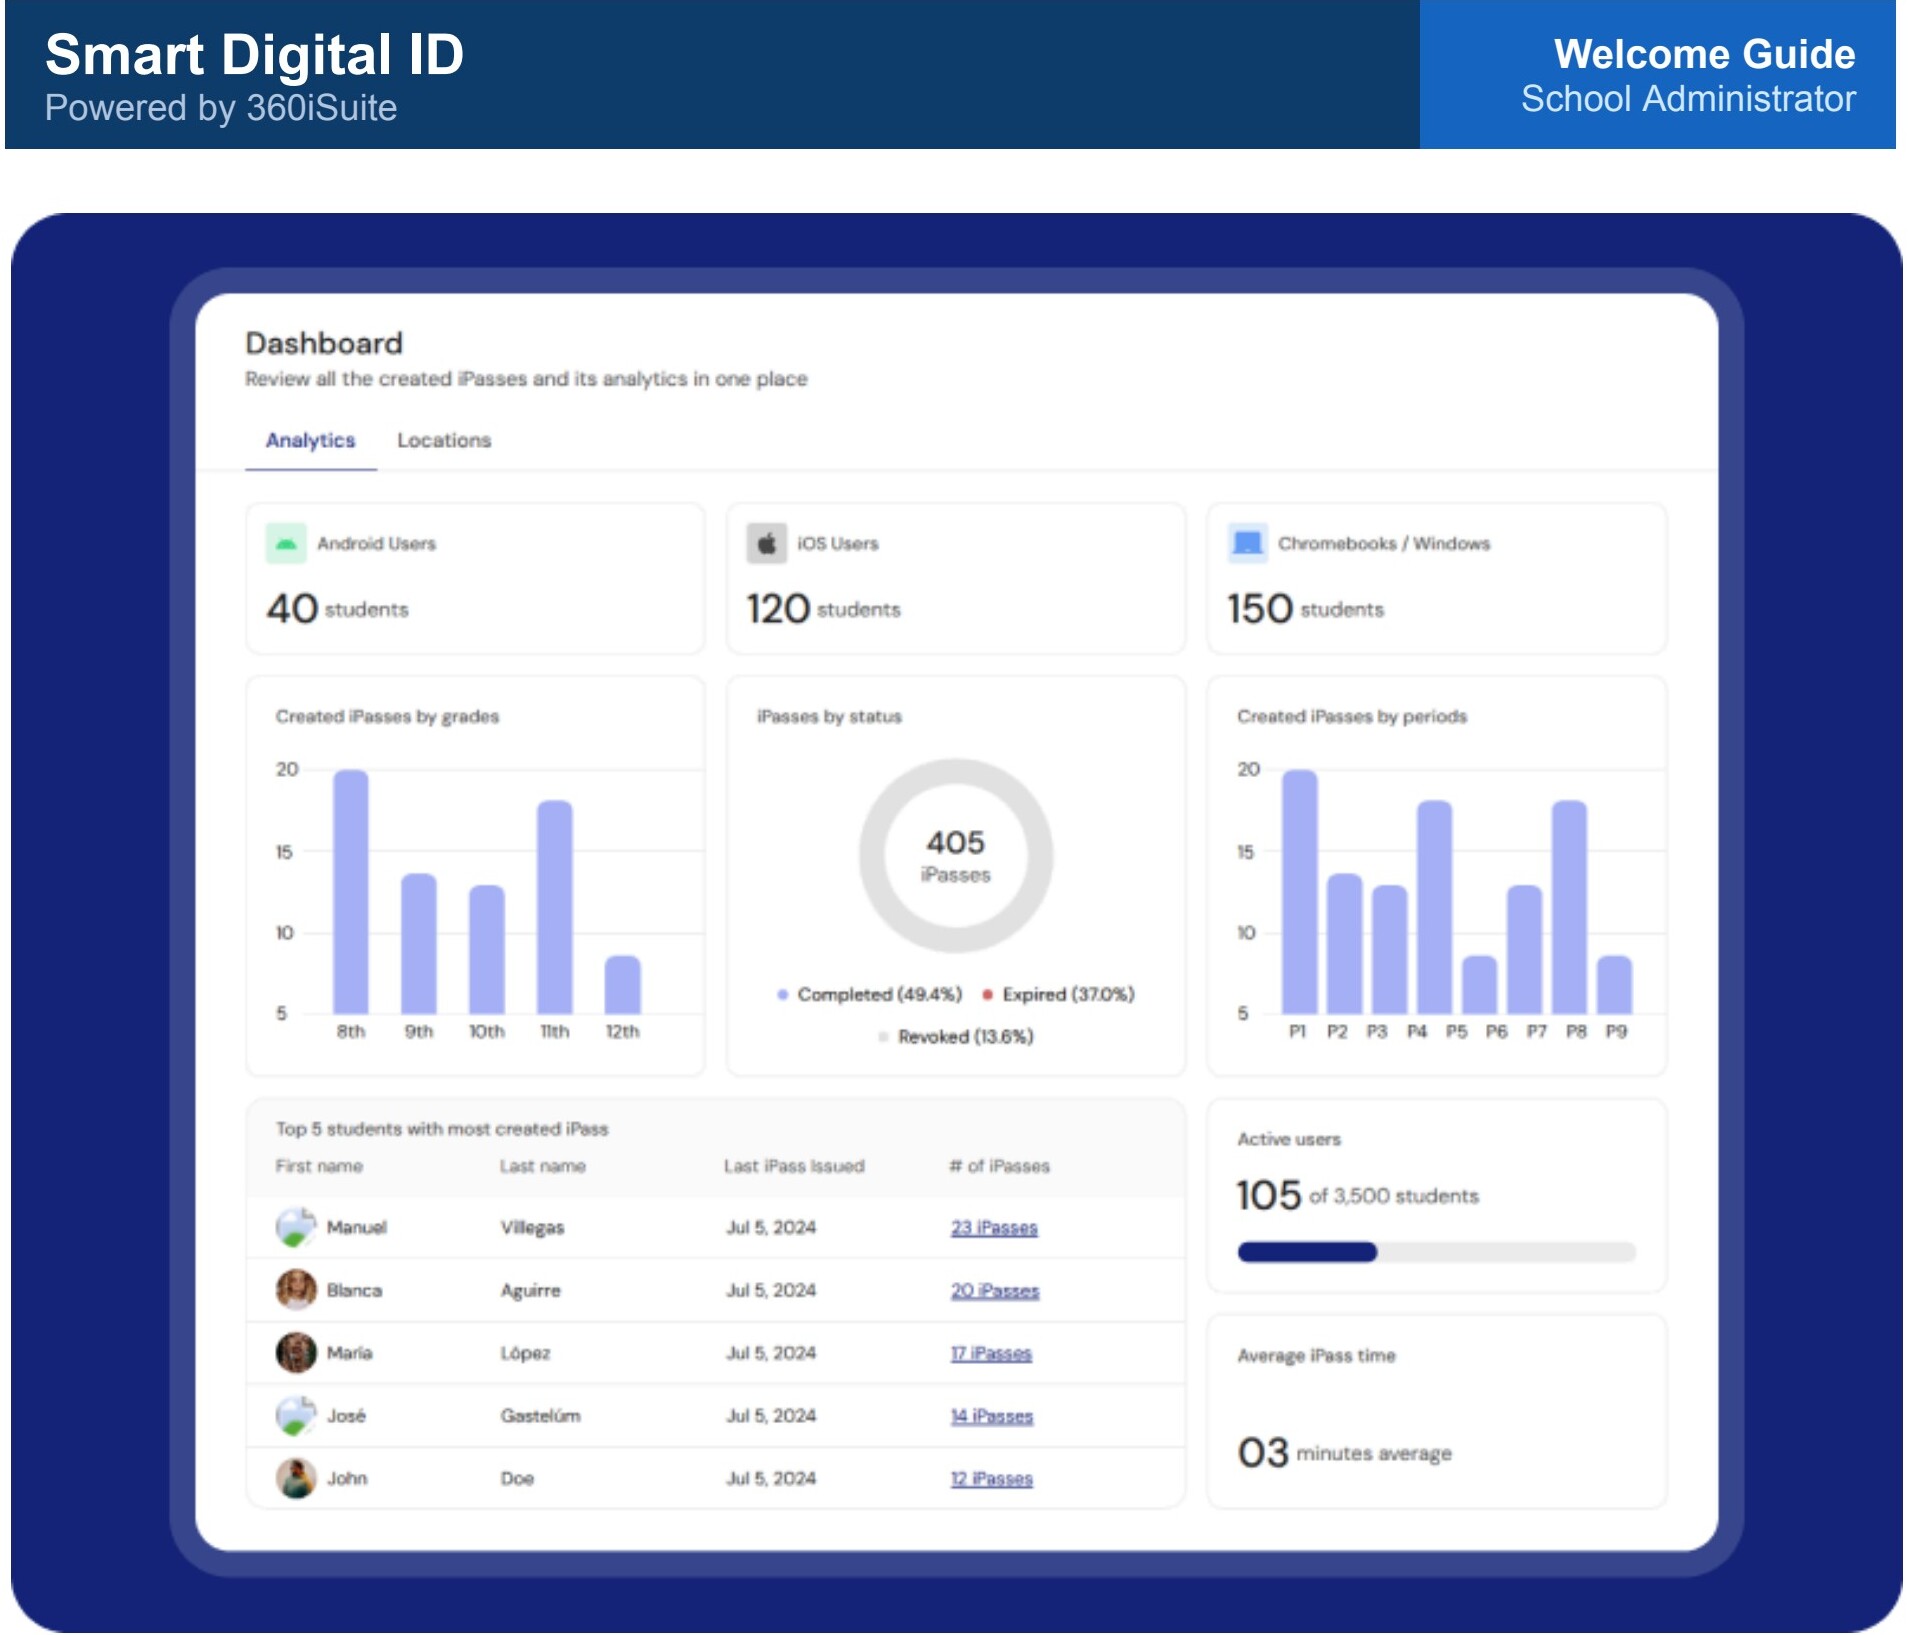
Analytics
The Analytics tab lets you review iPass information in one place — created iPasses by grade, status, periods, active users, average iPass time, and the students with the most created iPasses. This data is synchronized once per day; click the refresh button to update the dashboard manually.
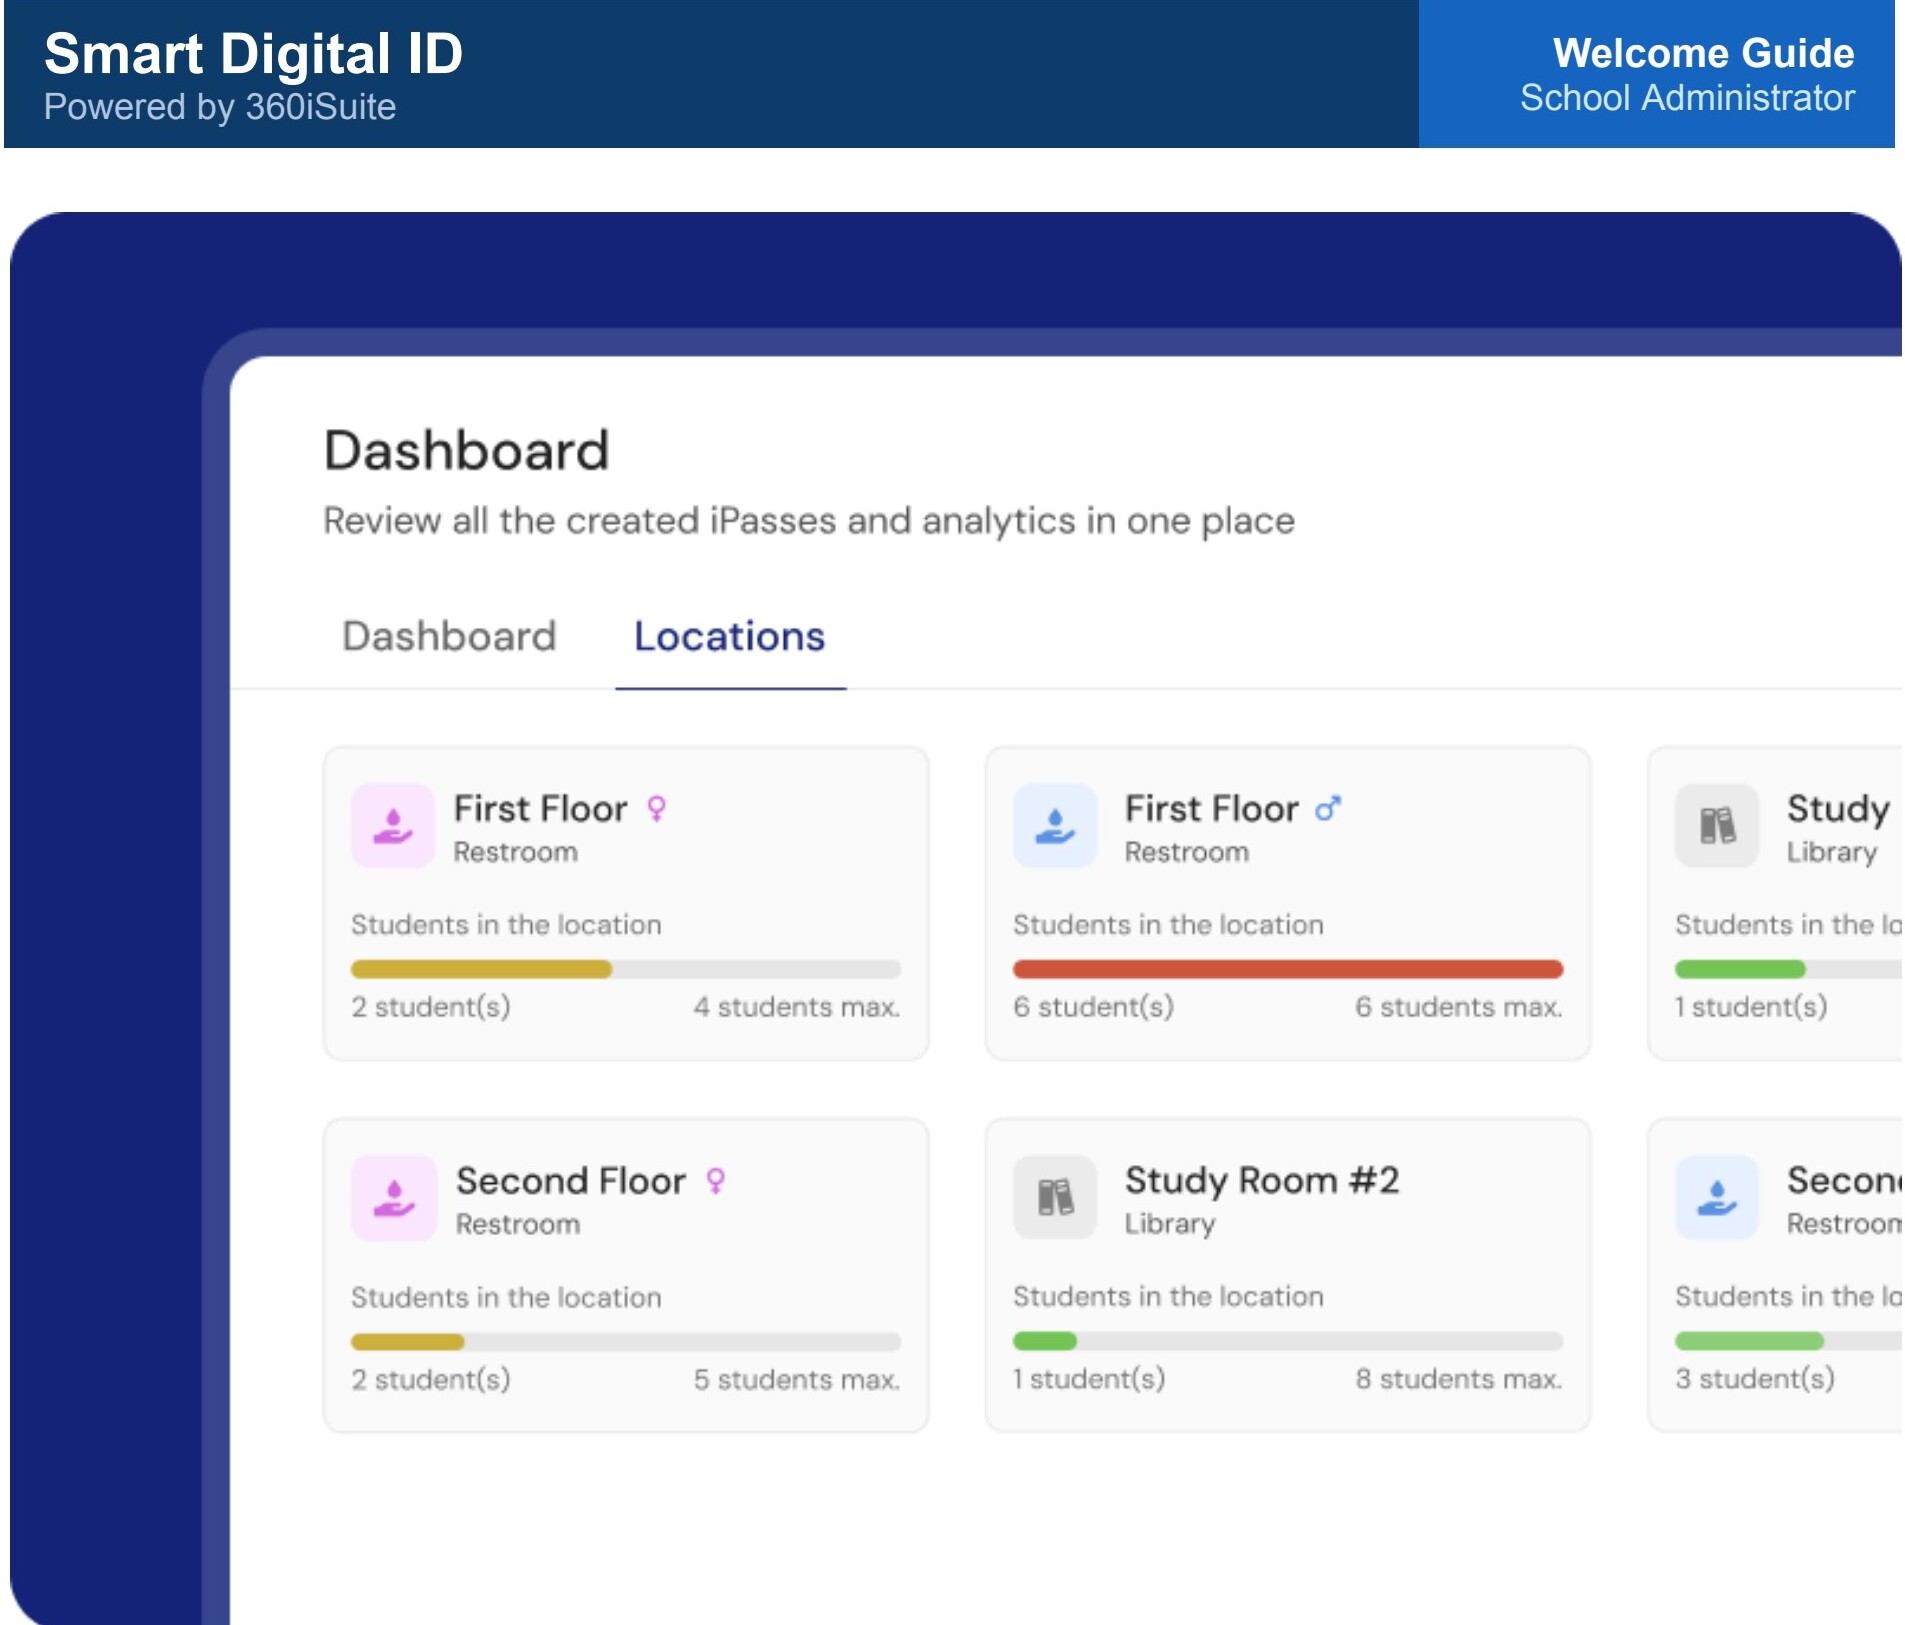
Locations
The Locations tab shows the current capacity of all locations at once, helping the school team make quick decisions when managing student movement. This information updates live — no need to refresh manually. The progress bar color changes based on location capacity, so it's easy to identify available spaces, locations close to the limit, and full locations.
Students
The Students module lets the school admin review all students registered in the school. Search for a student and see basic information including first name, last name, student ID, grade, and the number of iPasses created.
Click the number of iPasses to open the student's iPass history and review all passes assigned to them. The history includes badge number, origin, destination, issued date and time, and current status — making it easy to track completed, revoked, or expired iPasses in one place.
iPass Manager
Your go-to place for monitoring everything happening with passes across your school, in real time.
Daily iPass
The Daily iPass module lets you review and manage iPasses created during the day, organized by status.
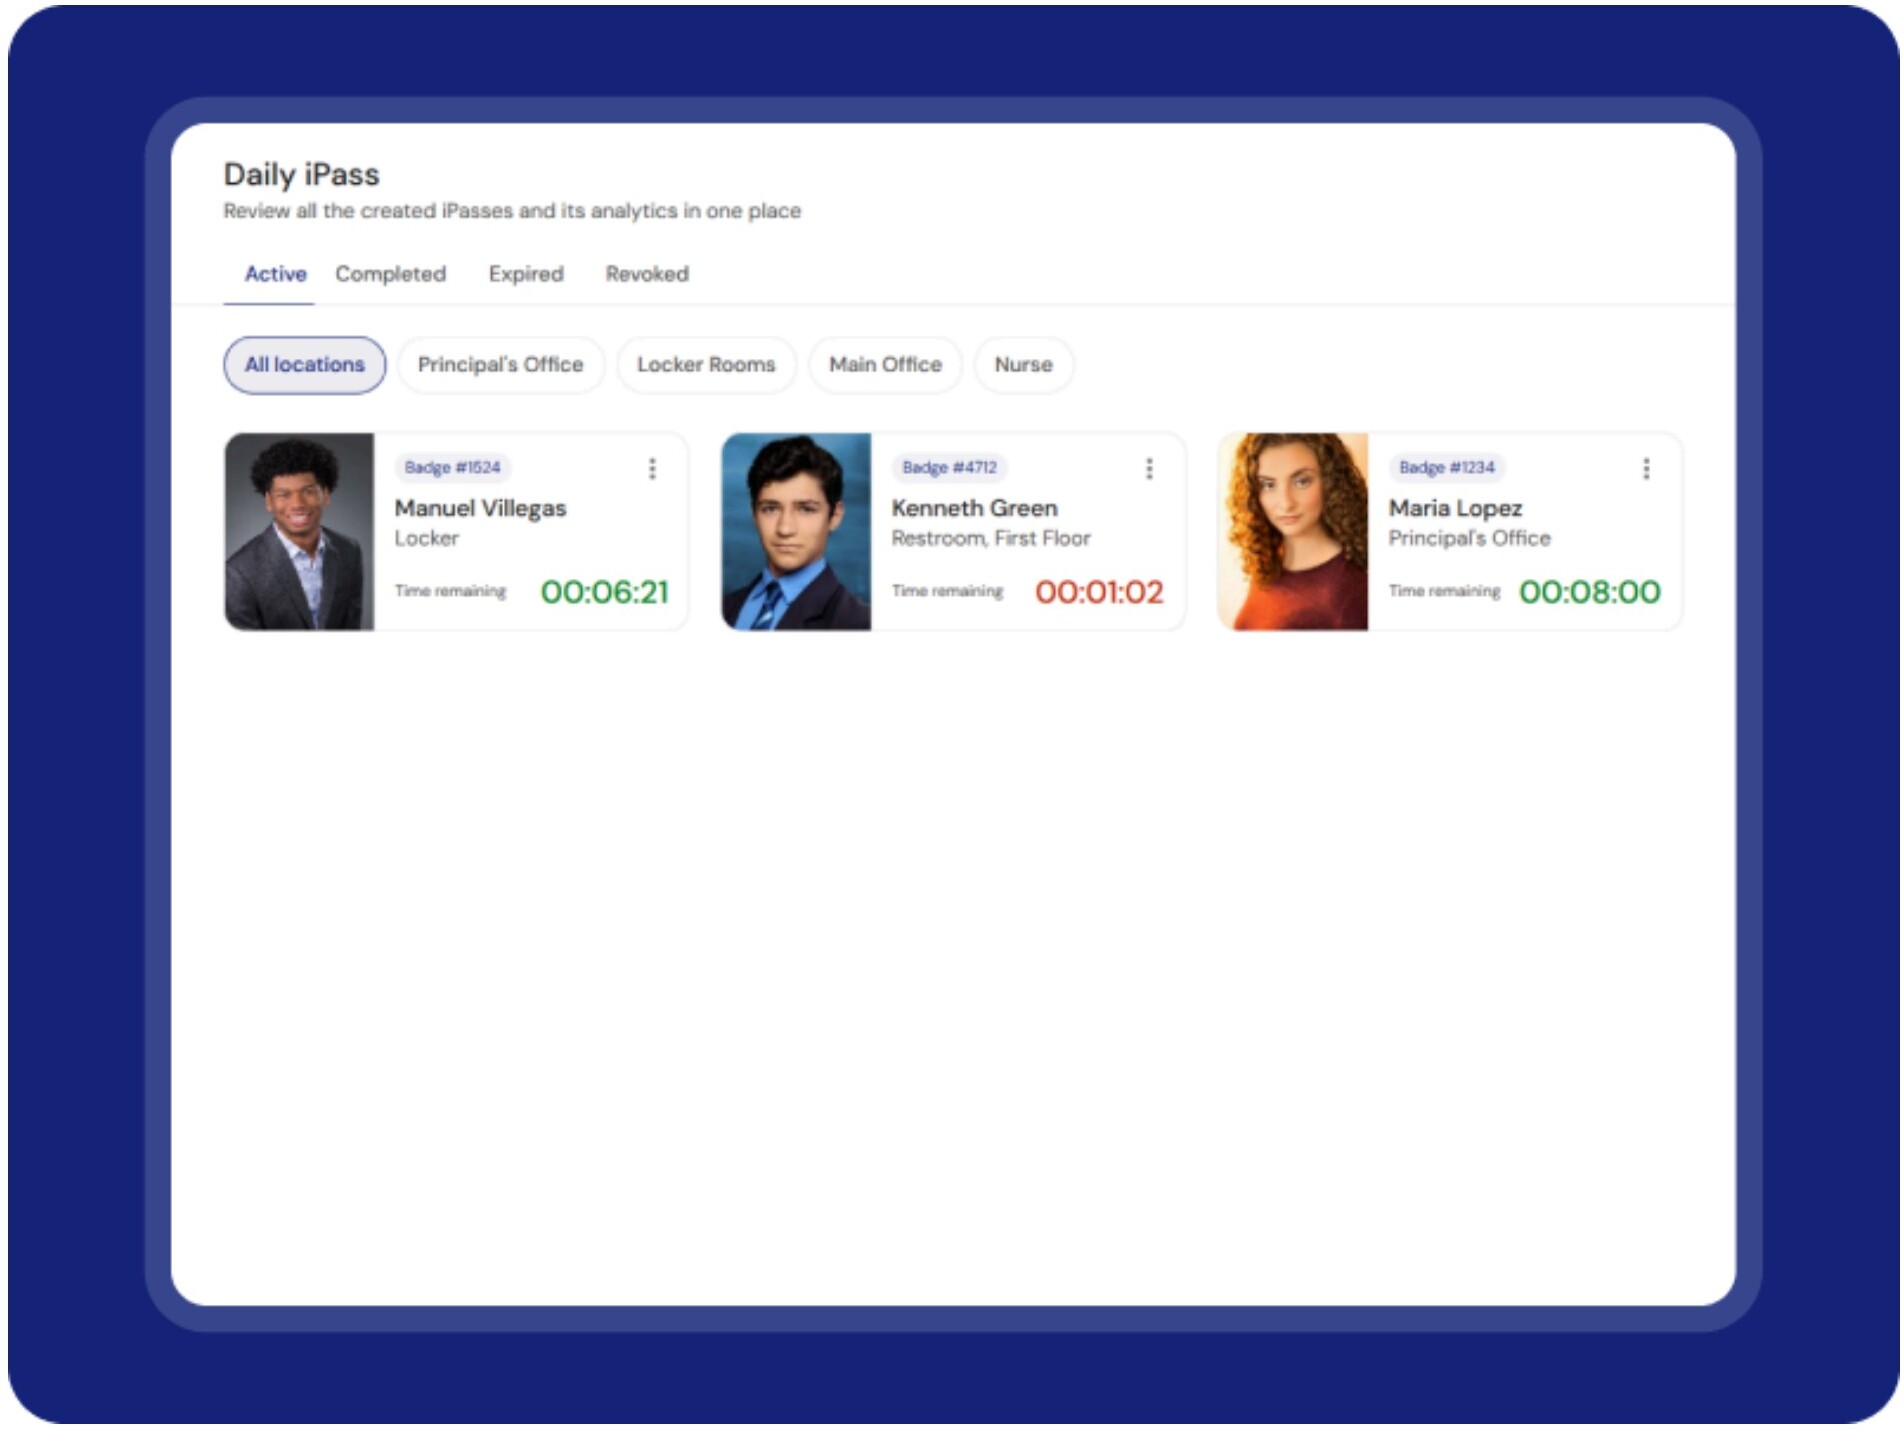
iPasses currently in progress. Updates automatically. Filter by all locations or a specific location using the location chips.
iPasses finished within the valid time. Can be ended by student or teacher — what matters is that it ended before expiring.
iPasses where the allowed time ended before the iPass was completed. Helps identify students who didn't finish on time.
iPasses canceled by a Campus Aide — for example, if the student was not in the correct location.
For Completed, Expired, and Revoked iPasses, narrow results by location, date, or student name.
Locations
The Locations module lets the school admin create and manage the places students can select when creating an iPass. Some locations are available for anyone, while others can be filtered by gender or separated into different rooms.
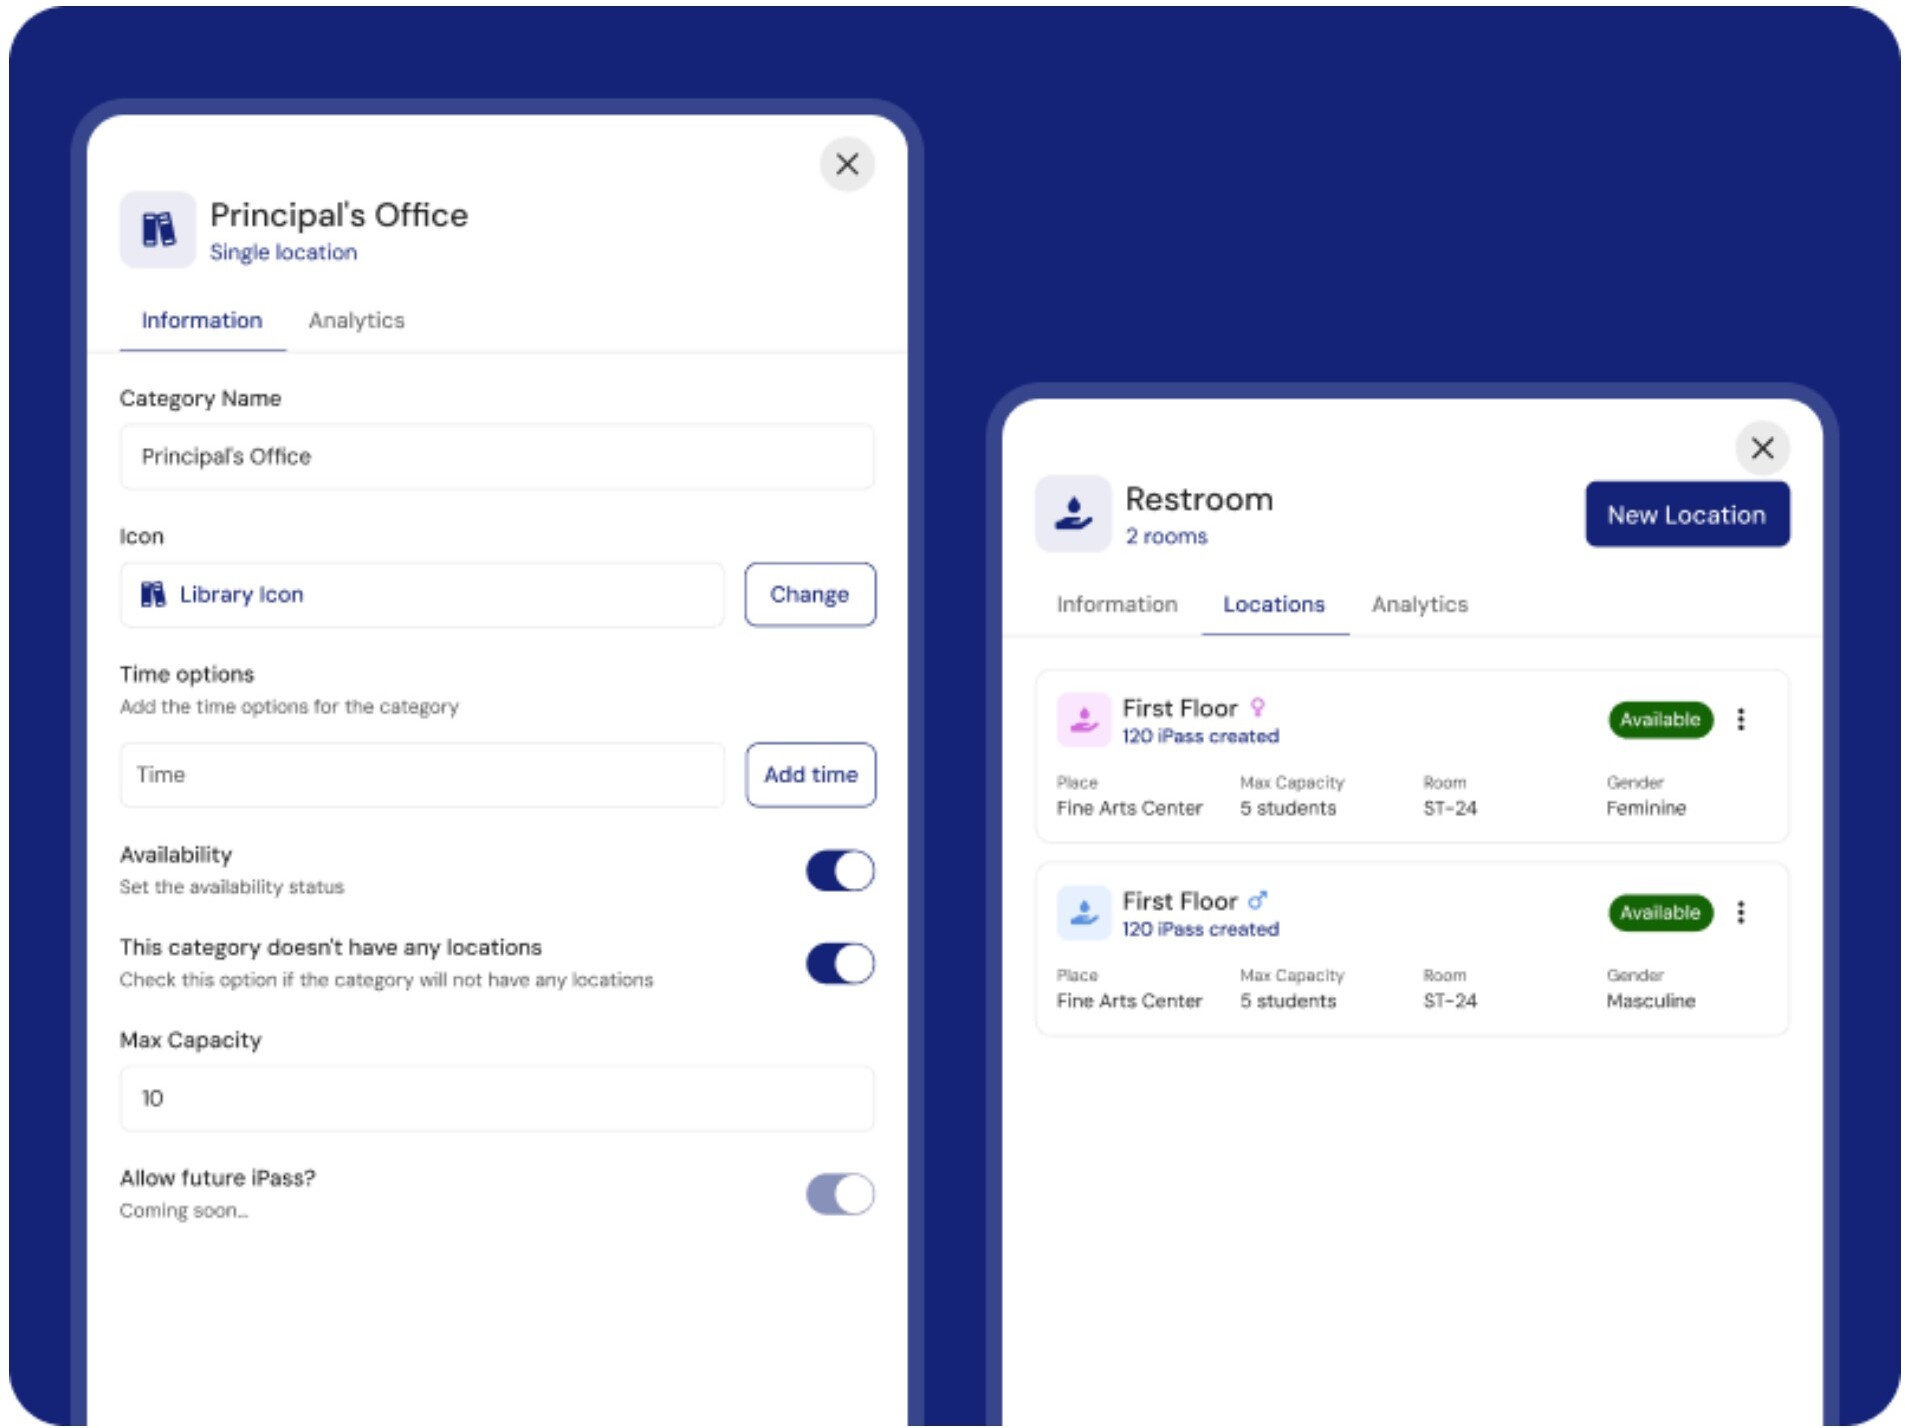
Single Location
Used for places that don't need separate rooms — such as the Principal's Office, Nurse, or Main Office. These work as one destination with one capacity, one gender setting, and one set of time options.
Location with Rooms
Used when one location needs to be divided into separate spaces. For example, a restroom location can have different rooms by gender, but rooms can also be created for any other separation the school needs. Each room can have its own capacity, gender, room number, and availability status.
Location information fields
- Location Name: The name displayed when a student or teacher creates an iPass — clear and easy to recognize (Nurse, Principal's Office, Restrooms, Library).
- Max Capacity: How many students can be in the location at the same time. For Single Locations, applies to the full location; for Locations with Rooms, set per room.
- Gender: Controls who can see and select the location or room. A location can be available for anyone, or assigned to a specific gender.
- Icon: Helps identify the location visually inside the platform.
- Time options: The amount of time students can select for that location when creating an iPass.
- Availability: Controls whether the location or room can be used when creating an iPass.
Badges
The Badges module manages the badge numbers used when creating an iPass. A badge is a physical item assigned to a room or classroom, with a unique badge number and QR code. When a student or teacher creates an iPass, they must enter a valid badge number first.
On mobile, students can scan the badge QR code to populate the badge number automatically — or enter it manually. Each school has its own set of badges, and each room or classroom has a set of available badges.
Badge statuses
Default status. The badge can be used to create a new iPass.
Not assigned to a room or classroom — cannot be used for iPasses. Useful for keeping badges in the system without making them available.
The student or teacher did not end the iPass. Helps identify badges that may still be in use or were not properly returned.
The student did not return to the classroom, or returned without the physical badge. Helps track badges that need to be recovered or replaced.
The iPass was revoked by a Campus Aide or teacher — canceled before completion.
Badge History
Each badge has its own history or log where you can review all status changes. The history shows when the status changed and who made the update — keeping clear control of badge usage over time.
Settings
Define the rules for how iPasses are created at your school. For example, configure whether only teachers can initiate passes, or set time limits and capacity rules per location.
General Settings
Make it yours! Update your school name, upload your logo, and choose a primary color that reflects your school's identity. The color you pick will automatically apply across the iPass platform for your students.
Users & Roles
Manage who has access to what. View all current users and assign roles to new staff:
- Admin — Full access to the Admin Portal
- Campus Aide — Access to the iPass Viewer app for hallway monitoring
- Teacher — Access to the Teacher Portal for managing student passes